The TAP® Incline Board: A Practical Position Paper for Coaches and Instructors
Oates Specialties LLC | oatesspecialties.com
At a Glance: Another Tool for the Right Pitching Problem
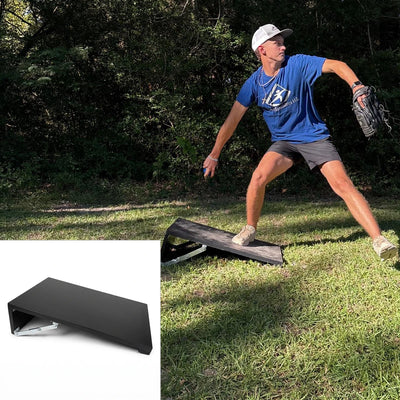
The TAP® Incline Board gives coaches a raised starting surface for selected pitching work on turf. For programs with limited mound access, it adds a height change that ordinary flat-ground throwing lacks. Coaches can approximate the height difference for the athlete’s stride on a mound, then check the athlete on a mound when one is available.
The board also changes two conditions on purpose: the back foot pushes from a steep surface, and the front foot lands on flat turf. The athlete keeps a ball, a target, and a pitching action while solving a different movement problem.
Like a mechanic choosing from a well-equipped toolbox, the coach selects the tool for the job. Its value is having another option when the athlete and the problem call for it.
The board weighs approximately 30 pounds, folds for storage, and is designed for turf. Moving the back foot changes the starting height while the surface angle stays the same.
Mound-matched height. Different push. Different landing.
Throw on an incline. Test it on the mound.
Oates explains the tool and the reasoning behind its use. The coach selects the athlete, names the purpose, chooses the exposure, and evaluates the response within the product’s operating conditions. The athlete contributes feedback about comfort, footing, and feel. Section 15 explains what is known about this exact board.
1. The Coach’s Decision Process
Select the Purpose
What specific response would help this athlete today? Choose one thing to watch, such as landing control, posture, timing, or strikes to a target.
Match the Task
Can the athlete manage the setup comfortably and under control? Consider skill, current physical condition, familiarity, footwear, and the readiness observations.
Choose the Exposure
What is the smallest useful block? Introduce a few controlled board throws within the athlete’s existing throwing plan, paired with comparable mound throws when available.
Compare the Response
What changed on the mound, and was it useful? Check the original goal, the athlete’s feedback, and any other changes in the delivery or command.
Keep, Adjust, or Put Away
If the mound throw improves, check whether the change holds. If another task offers a better fit, choose it. Pain, slipping, or board movement ends the block so the concern can be addressed.
2. The Coaching Situation
Some pitchers respond quickly to a cue. Others hear “stay closed” or “use your legs,” yet find a clearer response when the setting changes.
A coach may consider the board for:
- The pitcher whose hips or chest turn sooner than is useful for the delivery.
- The pitcher who appears to drift with little contribution from the back leg.
- The pitcher who loses posture while moving toward the plate.
- The pitcher who looks different on the mound than on flat ground.
- The program with limited mound access, where most throwing takes place on flat turf.
These are coaching observations, not diagnoses. Some hip turn before the front foot lands is normal. Effective pitchers use different positions and sequences. Name the useful change for this athlete rather than pursuing more push, a longer stride, or a more closed position for its own sake.
3. What the Board Changes
The board is 10 inches at its highest point, with a sloped surface 30 inches long, at a slope of approximately 15.7 degrees. In the downhill setup, the slope falls toward the target. The pitcher stands sideways and strides onto flat turf beyond the low end.
Match the Starting Height
For 4- to 6-foot strides on a regulation mound, the landing spot is approximately 3.5 to 5.5 inches below the top. The following marks approximate that height difference.
| Stride | Approximate height difference | Back-foot mark along surface |
|---|---|---|
| 4 feet | 3.5 inches | 6.75 inches |
| 5 feet | 4.5 inches | 10.5 inches |
| 6 feet | 5.5 inches | 14.25 inches |
Measure the board mark along the sloping surface from the low edge to the ball of the back foot. Measure stride horizontally from the ball of the back foot to the ball of the landing foot. The mound’s shape and the athlete’s foot position relative to the rubber affect the comparison.
Use the mark as a starting point. Choose a stable position with the whole foot supported. Matching height provides a repeatable reference; subsequent mound throws show the movement response.
Change the Push Surface
A mound provides relatively flat support near the rubber. The board tilts the surface under the back foot. Coaches use that difference to help an athlete feel the back leg working and explore how to move from it. The foot, ankle, hip, and trunk all contribute.
Change the Landing
The front foot lands on firm, level turf rather than the mound’s gentle downslope. That gives the athlete a different landing problem to solve.
The athlete is not throwing down a continuous 15.7-degree hill. The steep surface is under the back foot; the stride finishes on flat turf. The marks approximate the height difference for the athlete’s stride, rather than copying every part of a mound.
Adjust the Starting Height
Moving higher increases the height difference to the landing; moving lower reduces it. Athletes may adjust timing, stride, or posture in different ways.
Explore small changes only within fully supported positions near the middle third of the board. Compare the next mound throws. Comfortable, stable footing takes priority over an exact mark.
4. Why We Built It: The Lag
Fresh coaching ideas often begin with observation, experimentation, and a different way to present a movement problem. The Oates Education Hub article “The Lag” describes the interval between field experimentation and formal study.
During that interval, Oates explains the rationale and its limits, and coaches evaluate individual responses within the product’s operating conditions. Some ideas prove useful, some require adjustment, and some fit particular athletes.
The board is offered in that spirit: another option in the coach’s toolbox. Our working idea is that short, purposeful board-and-mound blocks may help some athletes find a useful change in back-leg use, timing, or landing that remains after the board is removed.
That is a hypothesis: a testable idea. The practical question is whether this application serves this athlete’s current goal. Related research provides a reason to explore it, rather than an assurance of the result.
5. The Practitioner Lens
In a demonstration at the Texas Baseball Ranch, Garrett Wolforth presents downhill, uphill from a wide stance, toes-down, and heels-down applications. The reported purposes include back-leg use, timing, posture, and responses to drifting or opening early.
The Ranch reports trying applications and keeping those that suit the individual pitcher. This is what the Ranch reports from its own use, rather than a controlled research finding.
This paper gives a step-by-step framework for the downhill setup. The other applications are described here as background on practitioner use. Choose other setups when the coach has assessed the athlete’s readiness for them.
The useful principle is selection: choose the movement problem, watch the response, and retain the application that serves the goal.
7. Match Readiness to the Athlete
Use this framework with athletes age 13 or older who have an established pitching delivery, are pain-free, and can manage the task under adult coach supervision. The age-13 threshold is a conservative program policy rather than a research-established boundary. Skill and physical readiness remain individual decisions.
A capable mound pitcher may need a simpler task on the board today. That is a reason to choose the appropriate task, not a label on the athlete.
Readiness Observations
- Complete the setup and footing checks in Section 8 first.
- Back-leg hold: hold the set position at the chosen mark for 10 seconds.
- Front-leg hold: hold a single-leg position on flat ground for 10 seconds.
- Step-and-stick: from a stable, fully supported position near mid-board, make three controlled step-down landings onto clear turf, holding each for 3 seconds.
Watch four things separately: the foot shifting, the pelvis dropping markedly, the trunk leaning noticeably, and the knee collapsing inward.
If any one appears, choose a simpler task for that day and reassess. This is a conservative coaching rule, not a validated injury screen. Check shoes, setup, familiarity, and comfort rather than assuming the cause. Persistent difficulty is a reason to involve an athletic trainer or another qualified professional.
8. Setup, Footwear, and Footing
Set Up Before the Athlete Steps On
- An adult unfolds the board and fully engages every locking support.
- Place it on level, firm turf. Push down on the high end to check for rocking or flex, and make sure the board does not slide.
- Inspect the hinge, supports, edges, and rubber. If anything is damaged, set the board aside and contact Oates.
- Keep fingers clear of hinges and support pinch points.
- Clear a full stride and follow-through area, with other people outside it.
- Use one athlete at a time. Fold, move, or adjust the board while it is unoccupied.
Select Footwear and Check the Surface
Use clean turf shoes with intact tread for the downhill framework described here. Keep metal spikes off the rubber.
Use clean, dry, textured rubber that remains fully bonded. Address dust, moisture, lifted edges, or wear before the athlete steps on.
At the mark, the athlete establishes the set position, shifts weight gently, and makes one controlled half-speed push. A foot slide or board movement ends the check. Correct the cause before reconsidering the task. Continue watching footing throughout the block; the half-speed check is an observation rather than a grip guarantee.
Set the Back Foot
Use the approximate height mark and a familiar mound foot angle. Keep the whole foot on the rubber, away from the edges. The goal is stable, comfortable support, not forcing a foot angle to match a number.
9. A Short Board-and-Mound Block
The coach can use this as a starting framework and adjust it to the athlete’s response and total throwing plan.
- After normal preparation, record a few baseline mound throws. Name one desired outcome.
- Complete the setup, footing, and readiness observations.
- Use the same delivery, pitch type, target, and intended effort for the comparison.
- Throw one fastball from the board at controlled bullpen effort, then two to four from the mound.
- Repeat three to four rounds while footing and execution stay controlled. That totals 3–4 board throws and 6–16 mound throws.
- Give a clear target or result goal. Ask what felt different.
- Compare the mound throws and decide whether the response serves the original purpose.
- Schedule the block after an appropriate warm-up and early enough that fatigue has not changed the task. Keep it within the athlete’s existing workload rather than adding it on top. Count every board throw in the daily throwing total, and follow Pitch Smart game-pitch limits and rest guidance. As a conservative scheduling choice, avoid extra board work the day before or after a start.
Fade According to the Response
One possible progression is one board throw to two mound throws in early sessions, then one to three, then one to four, followed by mound-only practice. Move sooner or stay longer according to the athlete’s response.
These ratios and schedules are coaching starting points rather than a tested product prescription. Put the board away when the useful response holds without it.
If the original outcome remains unchanged after two supervised sessions, reassess the setup and purpose. Another task or ordinary mound practice may be the better next choice.
10. Limited or No Mound Access
Limited Mound Access
For a program with one mound and many pitchers, the board adds a raised-start option on turf. A coach can rotate a small number of ready athletes through a short block, then onto the mound for comparison throws.
Allow enough clear space and supervision for the transitions. Keep the station focused on the named task rather than accumulating board throws.
No Mound Available
The board offers a height change that ordinary flat ground lacks. Set the starting mark, select a manageable task, and use flat-ground throws before and after to observe the response.
That comparison documents flat-ground response only. Check on a mound when one becomes available to evaluate mound transfer. Prioritize appropriate mound preparation before competition.
For rehabilitation and return-to-throwing, follow the athlete’s healthcare professional and established throwing plan.
11. What to Watch on the Mound
Watch board throws for stable footing and controlled execution. Judge pitching transfer on the mound.
Choose observations tied to the original goal:
- Stride length.
- Front-knee motion from landing to release.
- Where the hips or trunk point at landing.
- Posture at release.
- Strikes to a defined target.
Use the same camera position, pitch type, and intended effort. A side view helps compare stride, knee motion, and posture. For hip orientation, add a second camera angle from a safe position. Keep cameras and people clear of the throwing and landing paths.
Use video for visible movement comparisons. Joint loading and exact three-dimensional angles need appropriate instruments. Record velocity alongside command and movement; a steady radar reading can accompany a changed delivery.
Ask three questions: did the intended response appear today? Did it hold at the next session without the board? Does it remain over the following weeks?
A six- to eight-week review window can help organize observations. It is a planning choice rather than a proven deadline. Mound repetitions, feedback, and ordinary practice also influence the result.
12. Clear Stop Signs and Equipment Care
Pain, slipping, or board movement ends the block. So does a new delivery problem, such as the trunk diving forward early, the arm dragging, or the front knee collapsing. Address the concern before selecting the next task.
An ankle roll, a fall with symptoms, swelling, altered gait, or persistent symptoms calls for assessment by a qualified healthcare professional before return.
Keep supports fully functional, hinges secure, and rubber bonded. Set equipment with an unreliable lock, damaged hinge, or lifting or worn-smooth rubber aside and contact Oates. Use Oates guidance for repairs or surface replacement.
An adult handles folding and carrying. Store the board folded and dry, protected from weather and direct sun. Repeat the checks each session, including with experienced users.
13. Athlete, Parent, and Coach Actions
For the Athlete
- Establish solid footing before each throw and speak up when it feels uncertain.
- Use the same delivery and controlled effort on the board and mound.
- Aim at the target and describe what feels different.
- Report pain immediately and let the coach direct the next task.
- Let an adult handle setup and folding.
For Parents
Ask what the coach is evaluating and how it will be checked on the mound. A useful session has a named purpose, a brief exposure, and an observation afterward.
Count board throws in the daily throwing workload. Follow Pitch Smart game-pitch limits and required rest guidance while separately accounting for warm-up, bullpen, practice, and board throwing. The complete plan should consider all exposure.
A Simple Coach’s Record
Record six items: goal, setup, throws, athlete feedback, mound response, and next decision. Use that record to keep, adjust, or put away the tool.
14. Key Terms
Constraint: a deliberate change to the task or setting that shapes the movement problem.
Height difference: the vertical distance between the back-foot support and the landing surface; it describes the setup rather than the body’s exact fall.
Back leg or drive leg: the leg used to move from the rubber or board.
Front leg or stride leg: the leg that moves toward the plate and lands.
Opening early: hip or trunk turn sooner than is useful for that athlete’s sequence. Some hip turn before landing is normal.
Brace: the front leg helping manage forward motion after landing. An effective brace allows a well-timed delivery rather than requiring a locked knee.
Transfer: a response from one practice condition appearing in the target task.
Retention: a response remaining later without the original constraint.
Fade: reducing use of the tool while checking whether the response remains.
Hypothesis: a testable explanation or prediction.
15. Manufacturer and Evidence Statement
Oates Specialties LLC manufactures and sells the TAP® Incline Board. The rationale in this document and its companion paper draws on related research and reported practitioner experience. No controlled research study has established the training effects of this exact product.
This document provides information and an illustrative practice framework for coaches selecting tools for appropriately prepared athletes. The coach determines the athlete’s suitability, coaching goal, and practice exposure within the product’s stated operating conditions. Athlete feedback and subsequent mound performance guide continued use.
Published research describes the studies cited; references to researchers do not imply product endorsement. Oates makes no claim of increased velocity or reduced injury risk. Clinical assessment, rehabilitation, and return-to-throwing decisions remain with qualified healthcare professionals. Readiness and footing checks are practical observations rather than validated clinical clearance tests.
16. Further Reading
The TAP® Incline Board Technical White Paper: Rationale, Evidence, and a Testable Hypothesis provides detailed study descriptions, calculations, source-status notes, and possible ways to evaluate the idea. Read it alongside this practical paper for the evidence behind the rationale.
For product information or clarification, contact Oates Specialties or visit oatesspecialties.com.
November 2, 2026
TAP®, Khaos®, and SpeedChain® are registered trademarks of Oates Specialties LLC. Connection™ is a trademark of Oates Specialties LLC.
© Oates Specialties LLC. All rights reserved.
Related documents
Seven Pitchers. One Mound. | Meet the TAP® Incline Board.
TAP® Incline Board Training Guide: Developing the Push, the Drop, and the Brace
The TAP® Incline Board Technical White Paper: Rationale and Evidence
© 2026, Oates Specialties LLC